생체 인식은 사용자의 잠금 해제 과정을 훨씬 더 간단하고 안전하게 만들어준다.
오늘은 react native에서 생체 인식을 사용하는 방법에 대해서 기록하고자 한다.
사용할 모듈은 react-native-biometrics이다.
ios에서는 touch id와 face id를, android에서는 지문인식을 지원한다.
생체 인식 기능의 구조는 다음과 같다.
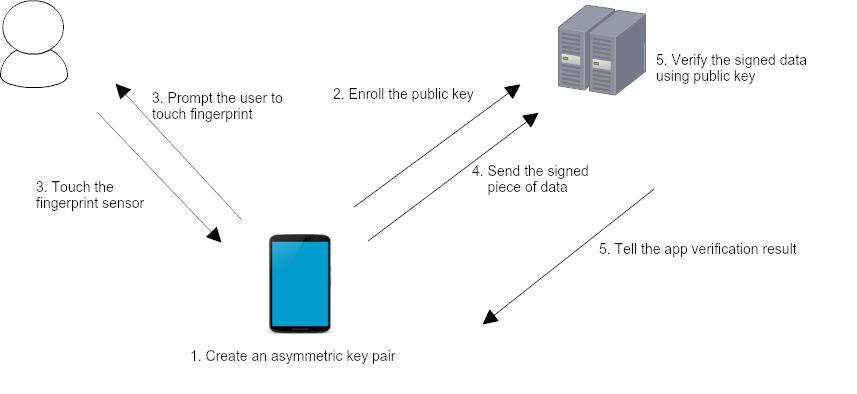
출처
New in Android Samples: Authenticating to remote servers using the Fingerprint API
News and insights on the Android platform, developer tools, and events.
android-developers.googleblog.com
이 사진으로는 잘 이해가 안 가서 조금 더 구체적으로 그려 봤다.
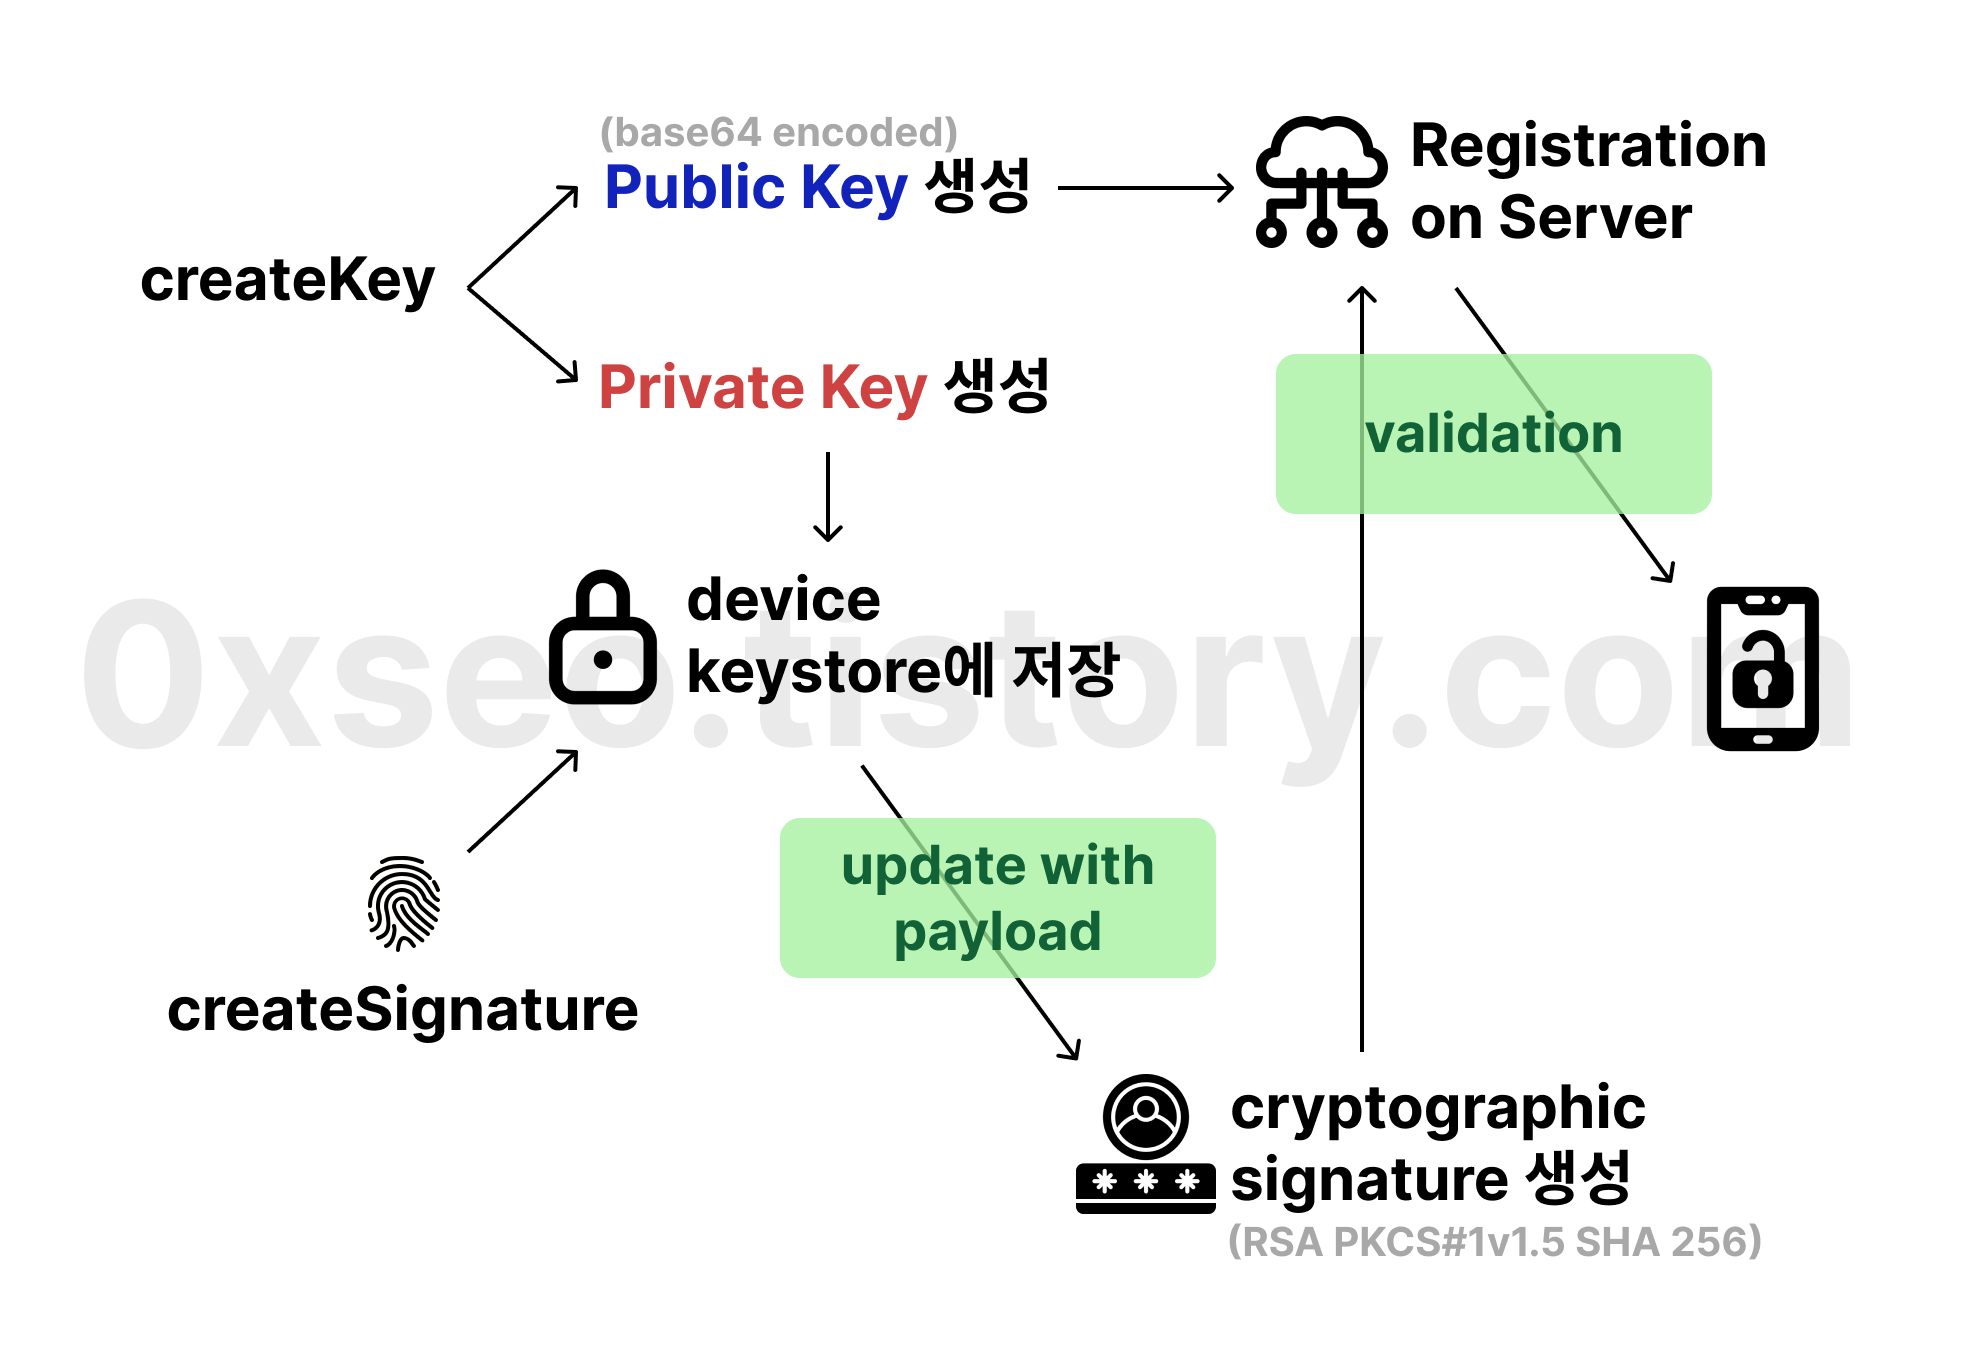
이 사진은 생체 인증 방식을 첫 등록(enroll)하는 과정이지만 인증(authenticate)하는 과정 역시 포함되어 있다.
사용자가 생체 인증 방식을 등록하기 위해서는 먼저 createKey 함수를 통해 public key와 private key로 이루어진 key pair를 생성해야 한다. 이때 public key는 서버에 등록하면 되고, private key는 기기 keystore에 저장된다.
여기까지는 기기에서 생체 인증을 시도하지 않는데, 서버에 전송하는 데이터에 지문 등 생체 정보를 담지 않기 위함이다.
그 후 createSignature 함수를 통해 생체 인증을 시도해서 성공한다면 아까 기기 keystore에 저장해 두었던 private key로의 접근이 허용된다. private key를 암호화된 signature를 받을 수 있는 것이다. 암호화 중에 이용되는 payload(이 경우엔 userID)는 서버에서 저장해 두었던 public key로 signature를 verify할 때 사용된다.
필요한 모듈을 먼저 다운받도록 하자.
npm i react-native-biometrics --save
cd iOS
pod install
ios에서는 추가적인 설정이 필요하다.
info.plist
<key>NSFaceIDUsageDescription</key>
<string>RoyalFund Authentication with TouchId or FaceID </string>
생체 인식을 진행하기 위한 util 파일을 제작한다.
biometrics.util.ts
우선 어떤 타입의 생체 인식이 가능한 기기인지 확인하는 함수이다.
import ReactNativeBioMetrics, { BiometryTypes } from 'react-native-biometrics'
const rnBiometrics = new ReactNativeBioMetrics()

export const booleanBiometrics = async () => {
  return rnBiometrics
    .isSensorAvailable()
    .then((resultObject) => {
      const { available, biometryType } = resultObject
      if (available && biometryType === BiometryTypes.FaceID) {
        return { result: true, type: biometryType }
      } else if (available && biometryType === BiometryTypes.TouchID) {
        return { result: true, type: biometryType }
      } else if (available && biometryType === BiometryTypes.Biometrics) {
        return { result: true, type: biometryType }
      } else {
        return { result: false, type: null }
      }
    })
    .catch(() => {
      return { result: false, type: null }
    })
}
생체 인증을 등록하기 위해서 private key, public key 쌍을 생성하는 함수이다.
import ReactNativeBioMetrics, { BiometryTypes } from 'react-native-biometrics'
const rnBiometrics = new ReactNativeBioMetrics()


export const createKey = async () => {
  return rnBiometrics
    .createKeys()
    .then((resultObject) => {
      const { publicKey } = resultObject
      return { result: true, key: publicKey }
    })
    . catch (() => {
      return { result: false, key: null }
    })
}
기기 keystore에 등록된 키가 있는지 확인하는 함수이다.
import ReactNativeBioMetrics, { BiometryTypes } from 'react-native-biometrics'
const rnBiometrics = new ReactNativeBioMetrics()

export const checkKey = async () => {
  return rnBiometrics
    .biometricKeysExist()
    .then((resultObject) => {
      const { keysExist } = resultObject
      if (keysExist) {
        return true
      }
      return false
    })
    .catch(() => {
      return false
    })
}
기기 keystore에 등록되어 있는 키를 삭제해주는 함수이다.
import ReactNativeBioMetrics, { BiometryTypes } from 'react-native-biometrics'
const rnBiometrics = new ReactNativeBioMetrics()

export const deleteKey = async () => {
  return rnBiometrics
    .deleteKeys()
    .then((resultObject) => {
      const { keysDeleted } = resultObject
      if (keysDeleted) { return true }
      return false
    })
    .catch(() => {
      return false
    })
}
생체 인식을 실제로 진행하고, private key가 payload과 함께 암호화된 signature를 반환하는 함수이다.
import ReactNativeBioMetrics, { BiometryTypes } from 'react-native-biometrics'
const rnBiometrics = new ReactNativeBioMetrics()

export const biometricSignIn = (msg: string, payload: string) => {
  return rnBiometrics
    .createSignature({ promptMessage: msg, payload: payload, })
    .then((resultObject) => {
      const { success, signature } = resultObject
      if (success) {
        return { result: true, key: signature }
      }
      return { result: false, key: null }
    })
    .catch(()  =>  {
      return { result: false, key: null }
    })
}
이 함수들을 활용해서 우선 생체 인식을 등록, 인증, 저장하는 함수를 만들어 보자.
export const handleCreateBiometricKey = async () => {
  // 키 생성
  const keyCreate = await createKey()
  if (keyCreate?.result && keyCreate?.key) {
    let publicKey = keyCreate.key
    // 생체 인증 가능한 기기인지 확인
    const biometriceCheck = await booleanBiometrics()
    if (biometriceCheck?.result) {
      const userId = userId
      // 생체 인증 시도
      const bioKey = await biometricSignIn('생체 아이디 등록', userId)
      if (bioKey?.key) {
        // signature 검증 (서버로 전달!)
        const isVerified = await verifySignature(publicKey, bioKey.key, userId)
        if (isVerified) {
          // 인증 성공!
          keyStore.setItem('bioPubKey', publicKey)
          return true
        } else {
          console.debug('verification failed')
        }
        return
      } else {
        console.debug('생체 인식을 사용할 수 없거나 등록되어 있지 않음')
      }
    } else {
      console.debug('생체 인식을 사용할 수 없음')
    }
  }
  deleteKey()
  keyStore.deleteItem('bioPubKey')
  return false
}
키를 생성하고, 생체 인증 가능한 기기인지 확인하고, userID를 이용해서 생체 인증을 실제로 시도한다.
생체 인증된 결과물(signature)을 서버로 검증하고, 검증되었을 경우 true를 return한다.
해당 프로젝트는 서버가 없어 keychain에 대신 public key를 저장했는데 서버가 있는 경우 저장할 필요는 딱히 없다.
다음으로 인증하는 함수를 만들어 보자. 생성된 키가 있는 경우에만 생체 인증을 시도할 것이다.
export const handleLoginBiometricKey = async () => {
  // 키 존재하는지 확인
  const keyCheck = await checkKey()
  if (keyCheck) {
    // 생체 인증 가능한 기기인지 확인
    const biometriceCheck = await booleanBiometrics()
    if (biometriceCheck?.result) {
      const userId = userId
      const bioKey = await biometricSignIn('로그인', userId)
      // bioKey.key 서버로 전송
      const publicKey = await keyStore.getItem('bioPubKey')

      if (bioKey?.key && publicKey) {
        // 인증되었는지 서버의 response 받기
        const isVerified = await verifySignature(publicKey, bioKey.key, userId)
        if (isVerified) {
          return true
        } else {
          console.debug('verification failed')
        }
      } else {
        console.debug('생체 인식을 사용할 수 없거나 등록되어 있지 않음')
      }
    } else {
      console.debug('생체 인식을 사용할 수 없음')
    }
  } else {
    console.debug('생체 인증 키 없음')
  }
  return false
}
저장된 private key가 있는 경우 생체 인증 가능한지 확인하고, 생체 인증 후 signature를 서버로 전송하여 verification을 진행한다. 마찬가지로 서버가 없어 직접 verfication을 진행했지만 그럴 필요 없다.
마찬가지로 해당 프로젝트와 달리 서버를 통해 로그인하는 경우 서버에서 verification과 동시에 로그인도 같이 진행해주면 될 것 같다.
(전문)
import ReactNativeBioMetrics, { BiometryTypes } from 'react-native-biometrics'
const rnBiometrics = new ReactNativeBioMetrics()

export const booleanBiometrics = async () => {
  return rnBiometrics
    .isSensorAvailable()
    .then((resultObject) => {
      const { available, biometryType } = resultObject
      if (available && biometryType === BiometryTypes.FaceID) {
        return { result: true, type: biometryType }
      } else if (available && biometryType === BiometryTypes.TouchID) {
        return { result: true, type: biometryType }
      } else if (available && biometryType === BiometryTypes.Biometrics) {
        return { result: true, type: biometryType }
      } else {
        return { result: false, type: null }
      }
    })
    .catch(() => {
      return { result: false, type: null }
    })
}

export const createKey = async () => {
  return rnBiometrics
    .createKeys()
    .then((resultObject) => {
      const { publicKey } = resultObject
      return { result: true, key: publicKey }
    })
    . catch (() => {
      return { result: false, key: null }
    })
}

export const checkKey = async () => {
  return rnBiometrics
    .biometricKeysExist()
    .then((resultObject) => {
      const { keysExist } = resultObject
      if (keysExist) {
        return true
      }
      return false
    })
    .catch(() => {
      return false
    })
}

export const deleteKey = async () => {
  return rnBiometrics
    .deleteKeys()
    .then((resultObject) => {
      const { keysDeleted } = resultObject
      if (keysDeleted) { return true }
      return false
    })
    .catch(() => {
      return false
    })
}

export const biometricSignIn = (msg: string, payload: string) => {
  return rnBiometrics
    .createSignature({ promptMessage: msg, payload: payload, })
    .then((resultObject) => {
      const { success, signature } = resultObject
      if (success) {
        return { result: true, key: signature }
      }
      return { result: false, key: null }
    })
    .catch(()  =>  {
      return { result: false, key: null }
    })
}

export const handleCreateBiometricKey = async () => {
  // 키 생성
  const keyCreate = await createKey()
  if (keyCreate?.result && keyCreate?.key) {
    let publicKey = keyCreate.key
    // 생체 인증 가능한 기기인지 확인
    const biometriceCheck = await booleanBiometrics()
    if (biometriceCheck?.result) {
      const userId = userId
      // 생체 인증 시도
      const bioKey = await biometricSignIn('생체 아이디 등록', userId)
      if (bioKey?.key) {
        // signature 검증 (서버로 전달!)
        const isVerified = await verifySignature(publicKey, bioKey.key, userId)
        if (isVerified) {
          // 인증 성공!
          keyStore.setItem('bioPubKey', publicKey)
          return true
        } else {
          console.debug('verification failed')
        }
        return
      } else {
        console.debug('생체 인식을 사용할 수 없거나 등록되어 있지 않음')
      }
    } else {
      console.debug('생체 인식을 사용할 수 없음')
    }
  }
  deleteKey()
  keyStore.deleteItem('bioPubKey')
  return false
}

export const handleLoginBiometricKey = async () => {
  // 키 존재하는지 확인
  const keyCheck = await checkKey()
  if (keyCheck) {
    // 생체 인증 가능한 기기인지 확인
    const biometriceCheck = await booleanBiometrics()
    if (biometriceCheck?.result) {
      const userId = userId
      const bioKey = await biometricSignIn('로그인', userId)
      // bioKey.key 서버로 전송
      const publicKey = await keyStore.getItem('bioPubKey')

      if (bioKey?.key && publicKey) {
        // 인증되었는지 서버의 response 받기
        const isVerified = await verifySignature(publicKey, bioKey.key, userId)
        if (isVerified) {
          return true
        } else {
          console.debug('verification failed')
        }
      } else {
        console.debug('생체 인식을 사용할 수 없거나 등록되어 있지 않음')
      }
    } else {
      console.debug('생체 인식을 사용할 수 없음')
    }
  } else {
    console.debug('생체 인증 키 없음')
  }
  return false
}
'개발 및 알고리즘 > 알고리즘' 카테고리의 다른 글
| Public Key로 암호화된 Private Key Signature 검증하기 (jsrsasign) (0) | 2024.08.17 |
|---|---|
| [React Native] 리액트 네이티브에서 keychain store 구현하기 (react-native-keychain) (0) | 2024.08.16 |
| [Python] Selenium으로 웹 크롤링 (이메일 긁어오기) (1) | 2024.08.08 |
| [AWS] CloudWatch Alarm 설정해서 Slack에 알림 보내기 (1) | 2024.08.07 |
| [React Native] 리액트 네이티브에서 커스텀 폰트 일괄 적용하기 (0) | 2024.07.30 |


